
Casualties: Unknown layers in order
The community reference lists 307.2 m (1,024 blocks) per layer and a 40% modifier chance on the standard Tough preset. Layer 10 never receives a modifier.
Scroll the table for more columns.
| Layer / walkthrough | Main threat | Bring or prepare |
|---|---|---|
| 1 · Gravel Lands | Short drops can still land on spikes or geysers. Look for scaffolding and ropes in connected caves. | Carry a dressing, drink and a light you can reach. |
| 2 · Deeper Gravel Lands | Without light holes, fences, bear traps and ticks are harder to see. Check side routes before dropping. | Bring a held light, water and storage for the barren stretch. |
| 3 · Dried Desert | Long falls, turrets, mines and oily pools make blind shortcuts costly. Scan the ceiling and landing. | Bring a bright light with a backup, enough drink and a way to stabilize an injury. |
| 4 · Wasteland | Sound cannons and radiation sources punish lingering or crossing while injured. Look for a detour around toxirock and spent fuel. | Bring a light that shows the path and keep treatment readily accessible. |
| 5 · Overgrown Depths | Plants hide grabbers, skullcrushers and creatures. Food is more abundant. | Keep light and a dressing handy and have a plan for the cold beyond the boundary. |
| 6 · Frozen Chasm | Cold builds between Ion space heaters, heatferns and life pods. Watch for icicles and gunmines. | Set out warm and plan the next reachable heat source before leaving shelter. |
| 7 · Fungal Pools | Constant rain can leave you wet and cold. Look for sawblades and grabber-shrooms. | Set aside light and keep enough energy to reach a life pod for sheltered rest. |
| 8 · Crystalline Hollow | Large falls and crystals with unusual properties disrupt routes. Inspect before touching. | Carry a backup light that you can still use if a battery is depleted. |
| 9 · Geothermal Vents | Heat, lava and disguised cryo-drones. Pressure builds lower in the layer. | Start with a light, accessible treatment and enough drink for a direct route. |
| 10 · Where We Must Reach | Air pressure rises as you spend time here. Locate the cargo chamber and drill pod while avoiding old traps. | Bring what you already need for the planned ending and enough light to recognize the chamber. |
| 11 · Crimson Ascent | The pod stops. The exit is above you, on foot, and the surface branch depends on prior setup. | Keep light, usable movement and the scarf in your inventory if pursuing Mercenary. |
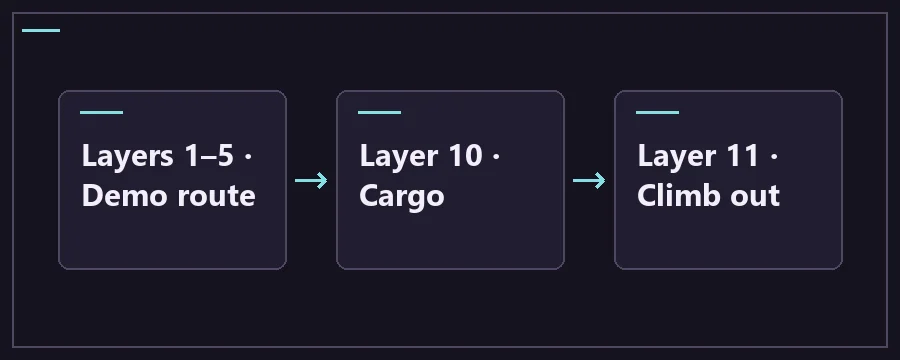
Which route should you follow?
Layer generation changes exact routes, and run settings can change hazards. In Endless mode, reaching the cargo restarts the cave loop before the surface route. In a normal run, Layer 11 reverses the direction you have been following.
Start in Gravel Lands
Put a working light in hand at the starting pod and check the caves to either side before making the first drop. Look for a short landing with a way back up, and scan it for spikes, jump pads and geysers. Use a nearby Glowplant fruit as a spare light if you find one and keep a drink, storage and a dressing accessible. Check injuries and movement before crossing into Deeper Gravel Lands, where the background light holes disappear.
Plan the descent in three legs
Use the two gravel layers to build a reserve while common supplies are easier to find. Layer 1 has light holes and smaller caves. Layer 2 takes away that natural lighting and adds threats you may miss at the edge of the beam. Before you leave it, handle injuries, choose a working light and decide how you will carry drink and a dressing in the desert.
Layers 3 to 5 reward a different pace. In the desert, check long landings and the space above them. In Wasteland, move around radiation and sound cannons before trying to collect anything nearby. The Overgrown Depths offer food and drink opportunities but make a cluttered landing harder to read. Use the supplies you find there to prepare for Frozen Chasm rather than spending time only because loot is nearby.
After crossing the demo boundary, plan around the conditions that persist while you travel. Look for warmth in Frozen Chasm, a dry rest spot in Fungal Pools and a way around unfamiliar crystals on Layer 8. Enter the vents with useful supplies already organized. In the lower vents and at the cargo layer, lingering for ordinary loot can cost time when pressure begins to build.
In Where We Must Reach, identify the cargo and the powered drill pod that carries you toward the surface. The final leg starts at Crimson Ascent after the pod breaks down. Look up, use visible footholds and keep the ending item with you if your route requires it. Decide whether you want spoilers before opening the ending guide.
Cave layer questions
How many layers are in the full game and demo?
The full release has ten main layers and the shorter Crimson Ascent as Layer 11, followed by the ending area. The Steam demo covers the first five layers. Use it to practice the earlier threats and check the full version for Frozen Chasm onward, playable character unlocks and the normal ending sequence.
How far down is one layer?
The community reference documents 1,024 blocks or 307.2 meters for a standard layer. The depth counter counts the progress down through the layers. Treat that reading as orientation. You still need to see a route to the local landing, and Crimson Ascent sends you upward instead of continuing that descent pattern.
Can two runs have the same route?
The caves are procedurally generated and settings can change threat and item density. Expect a layer’s hazards and themes to recur while exact ledges, ropes and objects move. Look for route signals in the current level. A screenshot from another run can show what a mine or pod looks like, but use your own landing and exits for movement decisions.
Which layers are best for gathering supplies?
The first two layers let you collect useful items before the barren desert and Wasteland. The Overgrown Depths offer more plant food again, alongside new dangers. Take what you can make use of before the next boundary. If you play Dune, plan for meat instead of treating the plants in the jungle as your food reserve.
What is a layer modifier?
A generated layer may get a modifier that changes the situation. The community reference gives a 40% chance on the default Tough preset and describes that chance as configurable in run settings. Layer 10 is documented as having no modifier. Check the settings and visible hazards of your own run before applying a route written for another preset.
What happens to the cargo in Endless?
Reaching the cargo sends you back to Deeper Gravel Lands in an Endless run instead of taking you through the standard ascent and ending. Check the run mode before planning a character unlock. The ordinary finish needs a normal run and enough progress to reach an ending, rather than just arriving at the cargo.
Why am I already seeing pressure before Layer 10?
The community layers reference places rising pressure in the lower part of Geothermal Vents. Layer 10 adds pressure that increases with time spent there. Take the first signs as a reason to check progress and plan a direct route. On the next layer, recognizing the cyan pulses helps you tell whether a detour is taking you away from the objective.
Where do I go after the drill pod breaks?
Climb upward through Crimson Ascent. The pod has already brought you from the cargo layer to the start of the final climb. Search for safe footholds above you and avoid a drop that sends you back down. Breaking through the top starts the surface sequence, where earlier route choices can determine which ending you see.